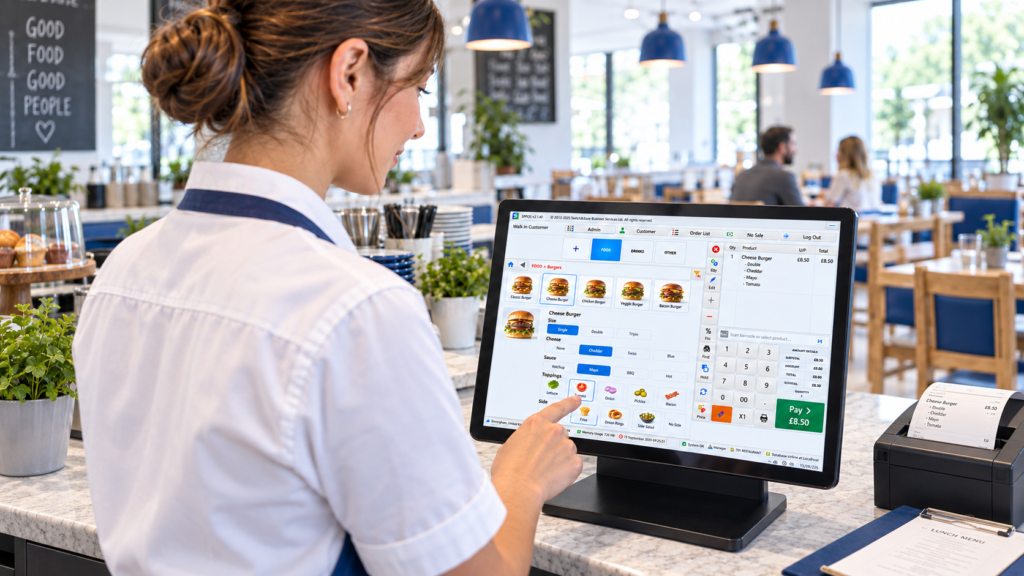
Menu modifiers let customers customise an item without staff having to enter confusing notes or create dozens of separate products. On a restaurant EPOS system, you can build modifier groups such as “Choose a size”, “Select your toppings” or “Add a side”, set any extra charges and decide which choices are required.
A good modifier setup makes ordering quicker, keeps prices accurate and gives the kitchen clear instructions. The key is to keep each group simple, apply it only to relevant menu items and test the complete order journey before going live.
Key Takeaways
| Point | What it means for your business |
|---|---|
| Use modifier groups | Organise choices such as sizes, toppings, sides and cooking preferences |
| Set clear selection rules | Decide whether a choice is required, optional or limited |
| Add prices carefully | Show customers exactly which extras increase the total |
| Keep kitchen instructions clear | Use short, familiar names that are easy to read on kitchen tickets |
| Test every ordering channel | Check the till, kitchen printer, online ordering, QR menu and kiosk |
| Review modifiers regularly | Remove unavailable options and update prices when your menu changes |
What Are Menu Modifiers on an EPOS System?
A menu modifier is an option attached to a food or drink item. It allows the person taking the order—or the customer ordering online—to customise the product.
For example, a customer ordering a burger might choose:
- How the burger should be cooked
- Whether to remove onions
- Which cheese to add
- A side dish
- An extra sauce
The burger remains the main product. The choices attached to it are the modifiers.
Modifiers are usually organised into groups. A group called “Choose your side”, for instance, might contain chips, salad, onion rings and sweet potato fries. Each option can have its own price, availability and selection rule.
This is different from creating a completely separate menu item for every possible combination. Without modifiers, you might end up with products such as “Large Chicken Burger with Cheese and Chips” and “Large Chicken Burger without Cheese and with Salad”. That quickly makes the menu difficult to manage.
A well-configured hospitality EPOS system keeps the main menu tidy while still giving customers plenty of choice.
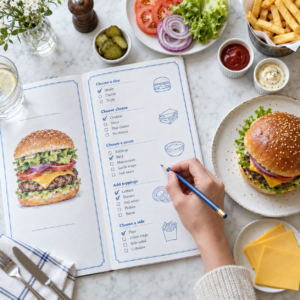
Why Menu Modifiers Matter
Modifiers do more than make the order screen look organised. They affect speed, pricing, kitchen communication and the customer experience.
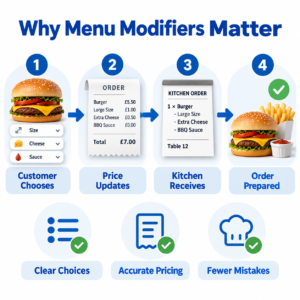
They reduce order-entry mistakes
During a busy service, handwritten or manually typed notes can be misunderstood. A clear button marked “No onions” is easier to process than an unclear note added in a hurry.
The selected modifier should appear on the order, kitchen ticket or kitchen display. The kitchen team can then see exactly what needs to be changed.
They make extra charges consistent
Imagine that extra cheese costs £1.00. If staff have to remember that price and add it manually, mistakes are likely. One employee may charge correctly, another may forget and another may enter the wrong amount.
Adding the price to the modifier means the restaurant EPOS system calculates it automatically whenever the option is selected.
They support upselling
Relevant optional extras give customers a simple opportunity to upgrade an order. Someone buying a pizza might add stuffed crust, extra toppings or a larger drink because those choices appear at the right moment.
This should still feel helpful rather than pushy. Show a short list of suitable additions instead of placing every possible extra on every product.
They keep different ordering channels consistent
If your business takes orders at the counter, through a branded website, by QR code or at a kiosk, modifiers help you offer the same structured choices across those channels.
Switch & Save can connect menu management with POS, online, QR and kiosk ordering. This helps prevent staff from maintaining completely separate versions of the same menu.
How to Set Up Menu Modifiers on a Restaurant EPOS System
The exact button names vary between systems, but the underlying process is normally similar.
Step 1: Review your menu before entering anything
Start with your current printed menu, takeaway leaflet or online menu. Identify every item that customers can customise.
Group similar choices together. Common modifier groups include:
- Size
- Cooking preference
- Milk choice
- Toppings
- Sauces
- Side dishes
- Optional extras
- Items to remove
Don’t build the groups directly from memory. Ask the staff members who regularly take orders which requests customers actually make.
The kitchen team should also be involved. They can tell you which wording is easiest to understand during a busy shift.
Step 2: Create a modifier group
Open the menu or product-management section of your EPOS back office. Look for an area labelled “Modifiers”, “Options”, “Add-ons” or “Product choices”.
Create a new group and give it a clear name. Staff and customers may see this wording, so use natural labels such as:
- Choose your pizza size
- Select up to three toppings
- How would you like your steak cooked?
- Choose your milk
- Add a side
Avoid internal abbreviations that a new employee or customer won’t understand.
Step 3: Add the modifier options
Enter the individual choices within the group. For a coffee shop’s milk options, that might be:
- Whole milk
- Semi-skimmed milk
- Skimmed milk
- Oat milk
- Soya milk
- Almond milk
If an option costs extra, enter the additional amount beside it. Standard options can remain at £0.00.
Use positive, direct descriptions. “No cheese” is clearer than “Cheese – negative”, while “Extra chicken” is clearer than a vague label such as “Protein upgrade”.
Step 4: Set the selection rules
Selection rules control how many options can be chosen. These rules prevent incomplete or unreasonable orders from reaching the kitchen.
You may need to set:
- Minimum selection: The fewest choices required
- Maximum selection: The highest number of choices allowed
- Required or optional: Whether the order can continue without a selection
- Multiple quantities: Whether the same extra can be selected more than once
Suppose a meal deal includes one drink. Set the minimum and maximum selections to one. The customer or staff member must then select exactly one drink before completing the order.
For pizza toppings, you might allow zero to five selections. For cooking preference, exactly one choice should normally be required.
Think carefully before making a group compulsory. Customers shouldn’t have to tap “No sauce” simply because the sauce group was incorrectly marked as required.
Step 5: Apply the group to the correct menu items
Once the group is ready, attach it to the relevant products.
A “Choose your milk” group might apply to lattes, cappuccinos and flat whites. It probably shouldn’t appear when someone orders a bottle of water.
Some groups can be reused across many items. For example, the same sauce group could apply to burgers, wraps and chicken meals. Reusing a properly maintained group saves time and helps keep pricing consistent.
Check each product individually after applying modifiers in bulk. A badly assigned group can create strange combinations and slow staff down.
Step 6: Arrange the display order
Place required decisions first and optional extras later.
For a pizza, a sensible order might be:
- Choose the size
- Choose the base
- Select toppings
- Remove ingredients
- Add dips or drinks
This follows the way the order is naturally built. It also reduces the chance that an essential choice will be missed.
Keep frequently selected options near the top. Staff shouldn’t have to scroll through a long list to find “No onions” or “Extra cheese”.
Step 7: Configure kitchen routing
Decide where the modifier information should go. Food instructions may need to appear on a kitchen printer or kitchen display, while drink customisations may need to reach the bar or coffee station.
For example, an order containing a burger and a milkshake could be routed like this:
- Burger and cooking modifiers to the kitchen
- Milkshake and flavour modifiers to the drinks station
- Full order and payment details to the customer receipt
The modifier should appear directly beneath its main item. This prevents “No cheese” from being mistaken for an instruction relating to another product.
For instance, a steak product could use a required modifier group called “Cooking preference” with rare, medium rare, medium, medium well and well done as the options.
A second optional group could offer sauces such as peppercorn, mushroom or béarnaise, with the appropriate additional price.
Or a chicken burger meal might use three groups:
- Choose your spice level
- Choose your side
- Choose your drink
The side and drink can be required, while extras such as cheese, hash brown or additional sauce remain optional.
If you accept delivery orders, structured modifiers reduce the need to decipher customer notes when the kitchen is busy.
Let’s take an example of a latte could include size, milk choice, syrup and extra espresso shot groups. Standard milk may carry no surcharge, while alternative milk, syrup and an extra shot can have separate prices.
If your café uses integrated card payments, the final customised price can pass directly from the till to the card machine. Staff don’t need to re-enter the total manually.
How Should You Price Menu Modifiers?
Start with your actual ingredient and preparation costs. An extra shouldn’t be priced only because another business charges a similar amount.
Consider:
- Ingredient cost
- Portion size
- Preparation time
- Packaging for takeaway orders
- VAT treatment
- Delivery-platform pricing
- The margin you need to protect
Show the extra charge clearly at the point of selection. Customers should see that oat milk costs more or that sweet potato fries carry an upgrade charge before they confirm the order.
Check the final VAT and receipt treatment with your accountant where necessary, especially if products or service methods may be treated differently.
Review modifier prices whenever supplier costs or portion sizes change. If equipment or software costs are holding back a wider menu upgrade, Switch & Save also offers information about business finance options.
Common Menu Modifier Mistakes
Creating too many choices
A modifier list shouldn’t contain every possible request your business has ever received. Long lists slow down order-taking and make self-service menus difficult to use.
Keep the regular choices visible. Staff can use a controlled order note for unusual requests if your process allows it.
Using unclear names
Labels such as “Option 1”, “Standard” or “Upgrade A” don’t explain what the kitchen should prepare. Use the actual ingredient, size or instruction.
Forgetting selection limits
Without a maximum limit, a customer may be able to select every included topping or several drinks within a fixed-price meal.
Set boundaries that match the product being sold.
Charging twice
Check whether an upgraded option should replace the standard choice or be added on top of it. If a customer selects premium chips instead of regular chips, they should normally pay only the upgrade difference—not the full price of both portions.
Ignoring unavailable ingredients
If an ingredient is out of stock, hide or disable the modifier across every relevant channel. Don’t leave customers able to pay for an option the kitchen can’t supply.
Failing to test receipts and kitchen tickets
A modifier may look correct on the till but appear in the wrong place on a kitchen printout. It might also be missing from the customer receipt or online confirmation.
Test the entire journey, not just the order screen.
Test the Setup Before Going Live
Place several trial orders that reflect real customer behaviour. Include a simple order, a heavily customised order, a meal deal and an order with no optional extras.
Check:
- The correct choices are required
- Selection limits work
- Prices and VAT calculate correctly
- Modifiers appear beneath the right item
- Kitchen instructions are readable
- Orders reach the correct preparation station
- Receipts show paid extras clearly
- Refunds include modifier charges correctly
- Online, QR and kiosk menus match the till
Ask a staff member who didn’t build the menu to place the test orders. If that person finds the choices confusing, customers probably will too.
Train Staff Using Real Orders
Training doesn’t need to be complicated. Show staff how to enter five or six common orders and explain what happens when an option is unavailable.
They should know how to:
- Find and select a modifier
- Correct a wrong choice
- Remove an optional extra
- Handle allergy-related requests
- Confirm paid upgrades
- Check what was sent to the kitchen
Modifiers can record a customer’s request, but they aren’t a substitute for your allergen procedures. Staff should follow your business’s established process when a customer mentions an allergy or intolerance.
Choose a Restaurant EPOS System That Fits Your Menu
The right restaurant EPOS system should let you build flexible modifier groups without making the order screen difficult to use. It should also send clear instructions to the kitchen and keep pricing consistent across the till, online ordering, QR ordering and kiosks.
Before choosing a system, test it with your real menu. Don’t rely only on a basic demonstration product. Try your most complicated pizza, meal deal, coffee or set menu and see how many taps it takes to complete the order.
Switch & Save provides AI-powered hospitality EPOS solutions for UK restaurants, cafés, takeaways, pubs and other food businesses. The system supports menu items, variants, modifiers, kitchen printing, kitchen displays, table service and connected ordering channels.
Explore the Switch & Save hospitality EPOS system, compare available EPOS bundles or contact the team to arrange a demonstration using your own menu.
Frequently Asked Questions
What is a modifier on a restaurant EPOS system?
A modifier is a structured choice attached to a menu item. Examples include size, toppings, cooking preference, milk type, sauce or side dish. It allows an item to be customised while keeping the order and price accurate.
What is the difference between a variant and a modifier?
A variant is usually a main version of a product, such as a small, medium or large pizza. A modifier is an additional choice, such as extra cheese or no mushrooms. The exact terminology can vary between EPOS providers.
Should every menu modifier have a price?
No. Preferences such as “No onions” or “Sauce on the side” will normally have no additional price. Extras, premium ingredients and size upgrades can carry a charge.
Can menu modifiers appear on kitchen printers?
Yes. A suitable hospitality EPOS system can print modifiers directly beneath the related item or show them on a kitchen display. Always test the formatting before using the setup during live service.
Can the same modifiers be used for online ordering?
Yes, provided your online ordering system and EPOS share or synchronise the same menu. Customers can then choose required and optional modifiers before submitting an order.
How many modifier options should I offer?
Offer enough choices to cover normal customer requests without making the menu difficult to navigate. There isn’t one correct number. A focused list of relevant options is usually more useful than a long list containing rarely requested combinations.
Can I temporarily disable a modifier?
Many modern EPOS platforms let you mark an option as unavailable or remove it from particular sales channels. This is useful when an ingredient is temporarily out of stock.
How often should menu modifiers be reviewed?
Review them whenever you change the menu, prices, ingredients or portion sizes. It’s also sensible to check them after staff feedback or repeated customer requests.
Ready to Improve Your Restaurant Ordering Process?
Well-planned modifiers make orders easier to enter, easier to prepare and easier to price. They give customers useful choices while helping your team avoid unclear notes and forgotten charges.
Switch & Save helps UK businesses reduce costs with AI-powered EPOS systems, card payment solutions and business finance.